
MobX is a simple, scalable and battle tested state management solution.
This tutorial will teach you all the important concepts of MobX in ten minutes.
MobX is a standalone library, but most people are using it with React and this tutorial focuses on that combination.
The core idea
State is the heart of each application and there is no quicker way to create buggy, unmanageable applications than by producing an inconsistent state or state that is out-of-sync with local variables that linger around. Hence many state management solutions try to restrict the ways in which you can modify state, for example by making state immutable. But this introduces new problems; data needs to be normalized, referential integrity can no longer be guaranteed and it becomes next to impossible to use powerful concepts like classes in case you fancy those.
MobX makes state management simple again by addressing the root issue: it makes it impossible to produce an inconsistent state. The strategy to achieve that is simple: Make sure that everything that can be derived from the application state, will be derived. Automatically.
Conceptually MobX treats your application like a spreadsheet.
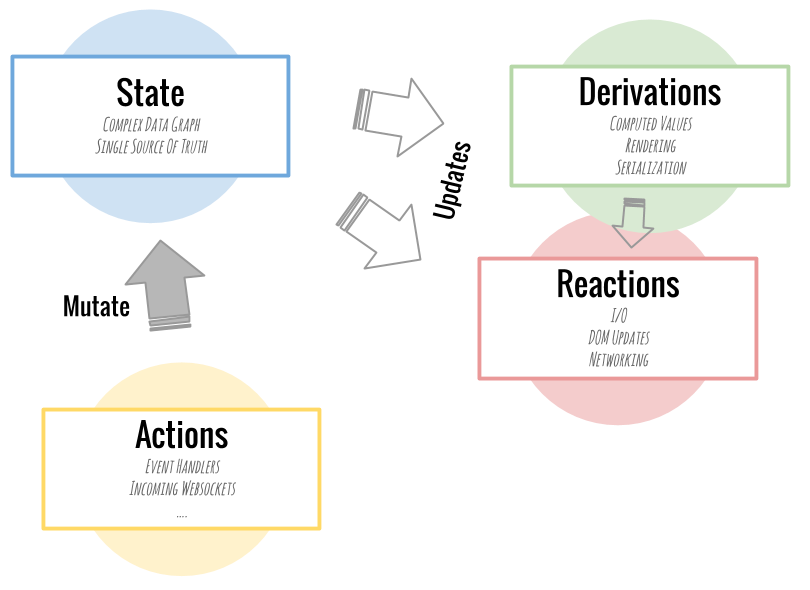
- First of all, there is the application state. Graphs of objects, arrays, primitives, references that forms the model of your application. These values are the “data cells” of your application.
- Secondly there are derivations. Basically, any value that can be computed automatically from the state of your application. These derivations, or computed values, can range from simple values, like the number of unfinished todos, to complex stuff like a visual HTML representation of your todos. In spreadsheet terms: these are the formulas and charts of your application.
- Reactions are very similar to derivations. The main difference is these functions don't produce a value. Instead, they run automatically to perform some task. Usually this is I/O related. They make sure that the DOM is updated or that network requests are made automatically at the right time.
- Finally there are actions. Actions are all the things that alter the state. MobX will make sure that all changes to the application state caused by your actions are automatically processed by all derivations and reactions. Synchronously and glitch-free.
A simple todo store...
Enough theory, seeing it in action probably explains more than carefully reading the above stuff. For originality's sake
let's start with a very simple ToDo store.
Note that all the code blocks below are editable,
So use the run code buttons to execute them.
Below is a very straightforward TodoStore that maintains a collection of todos.
No MobX involved yet.
We just created a todoStore instance with a todos collection.
Time to fill the todoStore with some objects.
To make sure we see the effects of our changes we invoke todoStore.report after each change and log it.
Note that the report intentionally always prints the first task only.
It makes this example a bit artificial, but as we will see later on it nicely demonstrates that MobX's dependency tracking is dynamic.
Becoming reactive
So far, there is nothing special about this code.
But what if we didn't have to call report explicitly,
but that we could declare instead that it should be invoked upon each relevant state change?
That would free us from the responsibility of calling report from any place in our code
base that might affect the report. We do want to be sure the latest report is printed.
But we don't wanna be bothered by organizing that.
Luckily that is exactly what MobX can do for us. Automatically execute code that solely depends on state.
So that our report function updates automatically, just like a chart in a spreadsheet.
To achieve that, the TodoStore has to become observable so that MobX can track all the changes that are being made.
Let's alter the class just enough to achieve that.
Also, the completedTodosCount property could be derived automatically from the todo
list. By using the observable and computed annotations we can introduce observable properties on an
object.
In the example below we use makeObservable to show the annotations explicitly,
but we could have used makeAutoObservable(this) instead to simplify this process.
That's it! We marked some properties as being observable to signal MobX that these values can change over time.
The computations are decorated with computed to identify that these can be derived from the state and caches as long as no underlying state changed.
The pendingRequests and assignee attributes are not used so far,
but will be used later in this tutorial.
In the constructor we created a small function that prints the report and
wrapped it in autorun. Autorun creates a reaction that runs once, and after
that automatically re-runs whenever any observable data that was used inside the function changes.
Because report uses the observable todos property, it will print the
report whenever appropriate. This is demonstrated in the next listing. Just press the run button:
Pure fun, right? The report did print automatically, synchronously and without leaking
intermediate values. If you investigate the log carefully, you will see that the fifth line
didn't result in a new log-line. Because the report did not actually change as a result
of the rename, although the backing data did. On the other hand, changing the name of the first
todo did update the report, since that name is actively used in the report.
This demonstrates nicely that
not just the todos array is being observed by the autorun, but also
the individual properties inside the todo items.
Making React reactive
Ok, so far we made a silly report reactive. Time to build a reactive user interface around this very
same store. React components are (despite their name) not reactive out of the box.
The observer HoC wrapper from the mobx-react-lite package fixes that by
basically wrapping the React component in autorun. This
keeps the component in sync with the state. This is conceptually not different from what we did
with the report before.
The next listing defines a few React components.
The only MobX specific code in there is the observer wrapping.
That is enough to make sure that each component individually re-renders when relevant data changes.
We don't have to call state useState setters anymore,
nor do we have to figure out how to subscribe to the proper parts
of the application state using selectors or higher order components that need configuration.
Basically, all components have become smart. Yet they are defined in a dumb, declarative manner.
Press the Run code button to see the code below in action. The listing is editable so
feel free to play with it. Try for example to remove all the observer calls, or
just the one decorating the TodoView. The numbers in the preview on the right highlight
how often a component is rendered.
The next listing nicely demonstrates that we only have to alter the data, without doing any further bookkeeping. MobX will automatically derive and update the relevant parts of the user interface again from the state in the store.
Working with references
So far we have created observable objects (both prototyped and plain objects), arrays and primitives. You might be wondering,
how are references handled in MobX? Is my state allowed to form a graph? In the previous listings
you might have noticed that there is an assignee property
on the todos. Let's give them some values by introducing another “store” (ok, it's just
a glorified array) containing people, and assign tasks to them.
We now have two independent stores. One with people and one with todos. To assign an assignee
to a person from the people store, we just assigned a reference. These changes will be picked
up automatically by the TodoView. With MobX there is no need to normalize data first
and to write selectors to make sure our components will be updated. In fact, it doesn't even
matter where the data is stored. As long as objects are made observable, MobX will be
able to track them. Real JavaScript references will just work. MobX will track them automatically
if they are relevant for a derivation. To test that, just try changing your name in the next
input box (make sure you have pressed the above Run code button first!).
Your name:
By the way, the HTML of the above input box is simply:
<input onkeyup="peopleStore[1].name = event.target.value" />
Asynchronous actions
Since everything in our small Todo application is derived from the state, it really doesn't matter when state is changed. That makes creating asynchronous actions really straightforward. Just press the the following button (multiple times) to emulate asynchronously loading new todo items:
The code behind that is really straightforward.
We start with updating the store property pendingRequests to have the UI reflect the current loading status.
Once loading is finished, we update the todos of the store and decrease the pendingRequests counter again.
Just compare this snippet with the earlier TodoList definition to see how the pendingRequests property is used.
Note that the timeout function is wrapped in action. This isn't strictly necessary,
but it makes sure that both mutations are processed in a single transaction, making sure any observers are only notified after both updates have completed.
observableTodoStore.pendingRequests++;
setTimeout(action(() => {
  observableTodoStore.addTodo('Random Todo ' + Math.random());
  observableTodoStore.pendingRequests--;
}), 2000);
Conclusion
That's all! No boilerplate. Just some simple, declarative components that form our complete UI. And which are derived completely,
reactively from our state. You are now ready to start using the mobx and mobx-react-lite packages in your own applications.
A short summary of the things you learned so far:
-
Use the
observabledecorator orobservable(object or array)functions to make objects trackable for MobX. -
The
computeddecorator can be used to create functions that can automatically derive value from the state and cache them. -
Use
autorunto automatically run functions that depend on some observable state. This is useful for logging, making network requests, etc. -
Use the
observerwrapper from themobx-react-litepackage to make your React components truly reactive. They will update automatically and efficiently. Even when used in large complex applications with large amounts of data.
Feel free to play around a bit longer with the editable code blocks above to get a basic feeling how MobX reacts to all your
changes. You could for example add a log statement to the report function to see when it is called.
Or don't show the report at all and see how that
influences the rendering of the TodoList. Or show it only under specific circumstances...
MobX doesn't dictate architecture
Please note that the above examples are contrived and it is recommended to use proper engineering practices like encapsulating logic in methods, organize them in stores or controllers, view-models etc. Many different architectural patterns can be applied, and some are further discussed inside the official docs. The above examples, and the examples in the official documentation show how MobX could be used, not how it must be used. Or, as somebody on HackerNews put it:
“MobX, it's been mentioned elsewhere but I can't help but sing its praises. Writing in MobX means that using controllers/ dispatchers/ actions/ supervisors or another form of managing dataflow returns to being an architectural concern you can pattern to your application's needs, rather than being something that's required by default for anything more than a Todo app.”